Google Play Store Setup
Last updated: January 24, 2026
Follow these steps to connect your Google Play app. This guide will walk you through creating a service account and granting the necessary permissions.
💡 Visual guides included! Each step below includes animated GIFs that show exactly where to click. Follow along with the visual guides as you complete each step.
Read-only access
We use your service account to retrieve financial reports from Google Cloud Storage. We will never modify, update, or delete anything in your Google Play Console account.
Before You Start
Make sure you have:
- •Access to your Google Play Console account
- •Access to Google Cloud Console (same Google account)
- •Your Google Cloud Project ID (you'll find this in Google Cloud Console)
Enable Required APIs
First, we need to enable the Google APIs that allow us to access your app's financial data.
📍 Google Cloud Console → APIs & Services → Library
- 1.Go to the Google Cloud API Library
- 2.Make sure you've selected the correct Google Cloud project from the dropdown at the top
- 3.Search for and enable these APIs (click on each one, then click "Enable"):
Visual guide:
Create a Service Account
A service account is a special account that allows our system to securely access your Google Play data.
📍 Google Cloud Console → IAM & Admin → Service Accounts
- 1.Go to Google Cloud Console Service Accounts
- 2.Make sure you've selected the correct Google Cloud project
- 3.Click "Create Service Account" at the top
- 4.Fill in the details:
- •Service account name: You can use any name, like "whatsthe-app-access"
- •Service account ID: This will auto-fill based on the name
- •Description: Optional - e.g., "Service account for whatsthe.app integration"
- 5.Click "Create and Continue"
- 6.On the "Grant this service account access to project" step, you can skip adding roles here. We'll grant permissions directly in Google Play Console instead.
- 7.Click "Continue" and then "Done"
Visual guide:
Download the JSON Key File
📍 Google Cloud Console → Service Accounts → [Your Service Account] → Keys tab
- 1.Find the service account you just created in the list
- 2.Click on the service account email address (it will look like:
your-service-account@your-project.iam.gserviceaccount.com) - 3.Go to the "Keys" tab at the top
- 4.Click "Add Key" → "Create new key"
- 5.Select "JSON" as the key type
- 6.Click "Create" - this will automatically download a JSON file to your computer
- 7.Important: Keep this JSON file safe! You'll need to paste its contents into our system.
Visual guide:

Grant Permissions in Google Play Console
This step is critical!
Without these permissions, we won't be able to access your financial reports. Make sure you grant both permissions listed below.
📍 Google Play Console → [Your App] → Setup → Users and permissions
- 1.Go to Google Play Console
- 2.Select your app from the list
- 3.In the left sidebar, go to "Users and permissions" (under "Setup")
- 4.Click "Invite new users" at the top
- 5.Enter the service account email address (the one that looks like
your-service-account@your-project.iam.gserviceaccount.com) - 6.You'll see three tabs: "App permissions", "Account permissions", and "Permission groups".
- 7.For historical revenue (bucket access): Click the "Account permissions" tab and grant:
- •View financial data, orders, and cancellation survey responses(Account-level - applies to all apps)
⏱️Important: WAIT 4 hours after granting permissions
Important: After granting account-level permissions in Play Console, you must WAIT up to 4 hours before the permissions will work. Google Play Console permissions can take up to 4 hours to propagate. If you see 403 errors immediately after granting account-level permissions, wait 4 hours and try connecting your app again. The app will save successfully, but historical revenue may show as $0 until permissions are fully active.
Visual guide:
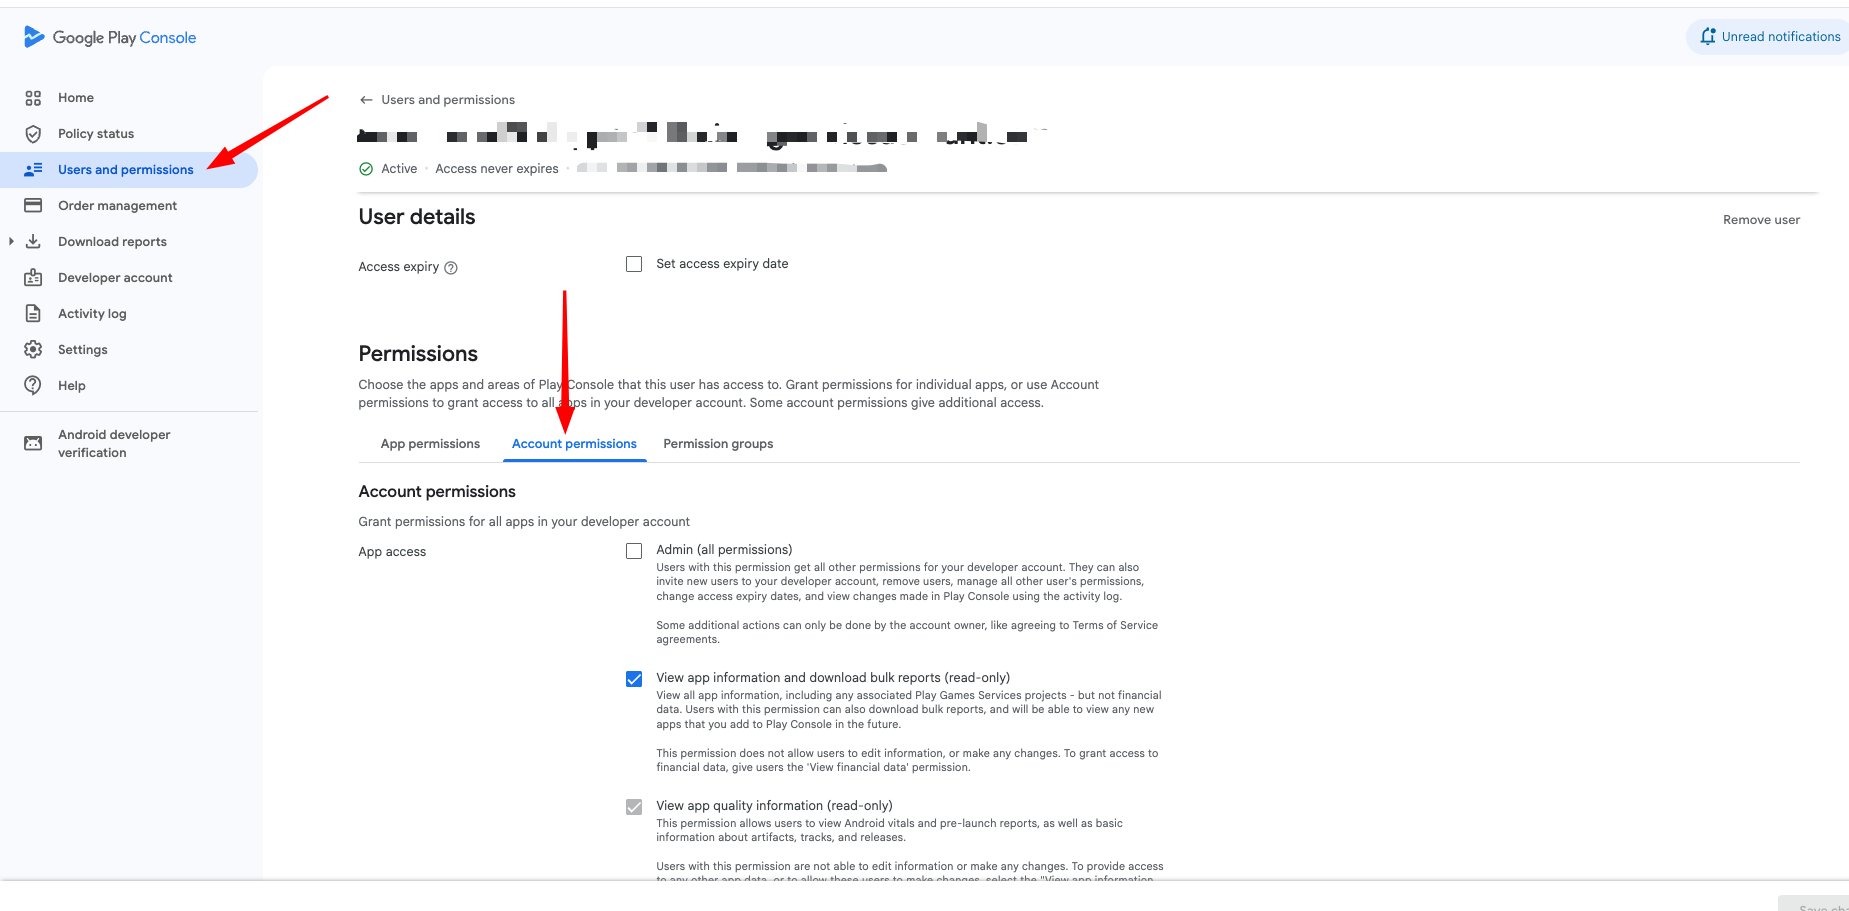
- 8.For real-time API access: Click the "App permissions" tab, select your app, and grant:
- •View app information (read-only)
- •View financial data(App-level - for this specific app)
- 9.Click "Invite user" or "Save changes" if editing an existing user
Visual guide:
Paste the JSON Key
- 1.Open the JSON file you downloaded in Step 3 (it should be in your Downloads folder)
- 2.Select all the content (Ctrl+A or Cmd+A)
- 3.Copy it (Ctrl+C or Cmd+C)
- 4.Go back to our app connection page
- 5.Paste the entire JSON content into the "Service Account JSON Key" field
Tip: The JSON file should start with { and contain fields like"type": "service_account","project_id","private_key", and"client_email".
Find Your Cloud Storage URI
To fetch your historical revenue data, you need to provide your Cloud Storage URI. This is where Google Play stores your financial reports.
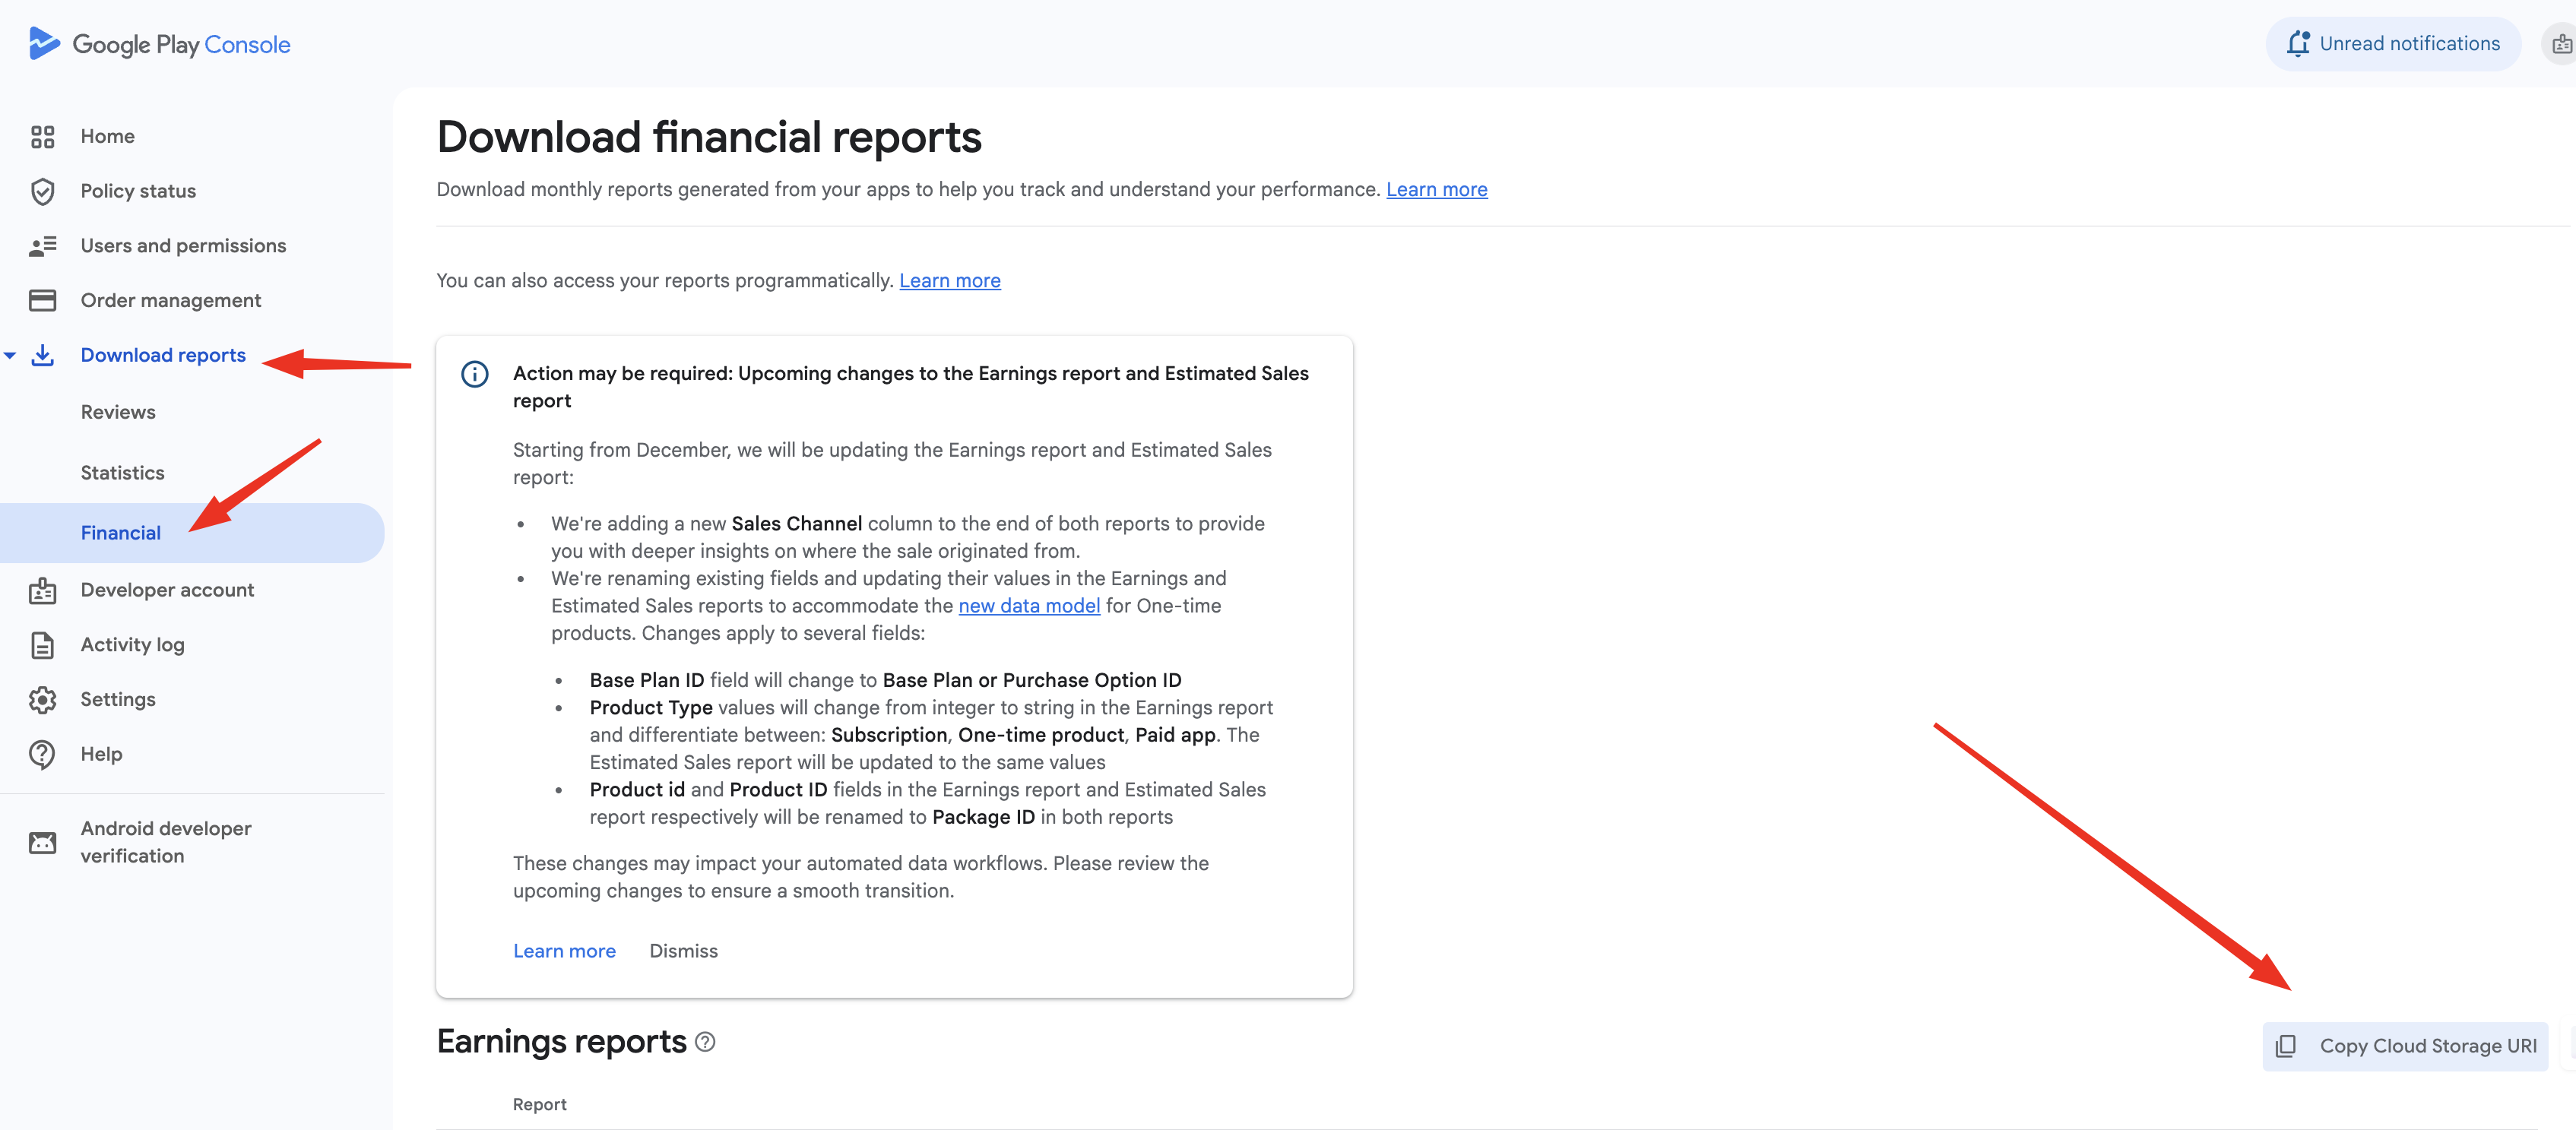
- 1.In Play Console, look for "Download reports" 📊 in the left sidebar menu (it's a top-level menu item, not under "Financial reports")
- 2.Click Download reports → Select Financial
- 3.On the Financial reports page, you'll see two sections: "Earnings reports" and "Estimated sales reports". Click the "Copy Cloud Storage URI" button next to "Earnings reports" (see screenshot below)
- 4.Click it to copy the URI (it looks like
gs://pubsite_prod_rev_12345678901234567890/earnings/) - 5.Paste the full URI into the "Cloud Storage URI" field on our app connection page
Visual guide:
Important: The "Copy Cloud Storage URI" button only appears if Google has already created the bucket. For apps with sales, the bucket should exist automatically. If you don't see it, the bucket may still exist but not be visible in the UI - contact support if you're having trouble finding it.
⚠️ Permission Requirement: To access the Cloud Storage bucket for historical revenue data, you need to grant Account-level permissions using the "Account permissions" tab (not "App permissions"). The account-level permission is called "View financial data, orders, and cancellation survey responses" - this applies to all apps in your account. App-level permissions work for API access but don't grant bucket access. If you only grant app-level permissions, we'll use the API method which shows current subscriptions but not historical revenue totals.
Important Notes
Credentials may take time to activate
After setting up your service account, it can take up to 36 hours for Google to fully activate the credentials. If you see errors immediately after setup, wait a bit and try again.
What we access
We only access your financial reports from Google Cloud Storage. We cannot modify your app, change settings, or access any other data beyond what's needed to display your revenue metrics.
Security
Your service account JSON key is encrypted and stored securely. Never share this key publicly or commit it to version control. If you accidentally expose it, delete the service account and create a new one.
Troubleshooting
"Invalid credentials" or "Permission denied"
- •Make sure you granted both permissions in Google Play Console (Step 4)
- •Verify the service account email matches exactly in both places
- •Wait up to 36 hours for credentials to activate
- •Try re-uploading the JSON key file
"Cannot find financial reports" or "Bucket not found"
- •Make sure you granted the "View financial data" permission
- •
To find your bucket name:
- In Play Console, look for "Download reports" 📊 in the left sidebar menu (it's a top-level menu item, separate from "Financial reports")
- Click Download reports → Select Financial
- On the Financial reports page, look for the "Copy Cloud Storage URI" button (see screenshot below)
- Click it to copy the URI (looks like
gs://pubsite_prod_rev_12345678901234567890/sales/) - Extract the bucket name: the part between
gs://and the first/(e.g.,pubsite_prod_rev_12345678901234567890)
If you don't see this button, the bucket may not exist yet - this is normal and NOT blocking!
- •Note: The bucket is in Google's managed project, so you won't see it in your own Google Cloud Console. This is normal!
- •Note: The "Copy Cloud Storage URI" button only appears if Google has already created the bucket. For apps with sales, the bucket should exist automatically. If you don't see it, the bucket may still exist but not be visible in the UI - this is NOT blocking!
- •Your app needs to have generated at least one financial report (usually happens after your first sale)
"API not enabled"
- •Go back to Step 1 and make sure both APIs are enabled
- •Verify you're using the correct Google Cloud project
Still having trouble?
Make sure you've completed all 5 steps above. If you're still experiencing issues after 36 hours, double-check that the service account email matches exactly in both Google Cloud Console and Google Play Console.